
 Yahoo News
 How to group an Access report on the fly

When viewing data in a report, you probably want to see that data organized in a way that's meaningful to you. For example, if you're viewing a list of employees, you might want to sort the employees by last name and then first name, which would make it easier for you to find specific employees. Sorting is helpful -- but sometimes, it isn't enough.
Sometimes your data comes in groups. If your company's large enough, you may group employees by department before sorting them in alphabetical order to narrow down your search. Grouping is great when you want to distinguish records quickly for viewing or summarizing that group's data. In this article, I'll show you how to use click events to quickly regroup a report on the fly, so you and your users can choose how they view the data. Don't worry, if you're not a whiz at VBA -- you don't need to be to apply this technique.
This article is set in Access 2010, but it'll work in 2013. For your convenience, you can download the example .accdb file. You'll need basic query and report building skills. (On-the-fly grouping is more complex in Access 2003; there's no 2003 solution in this article.)
The objects
The report shown in Figure A is based on the query and table shown in Figure B. Initially, it groups by the Species column, which I specified when creating the report using the Report Wizard. (That will be important to remember later.) In a real database, many of these fields would be populated by lookup tables, but I opted to simplify the example.
Figure A
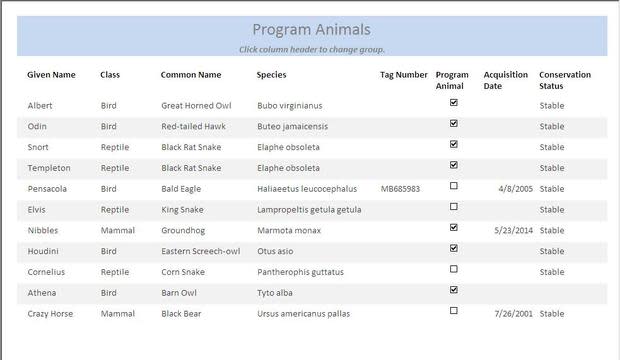
This simple report is grouped by species.
Figure B
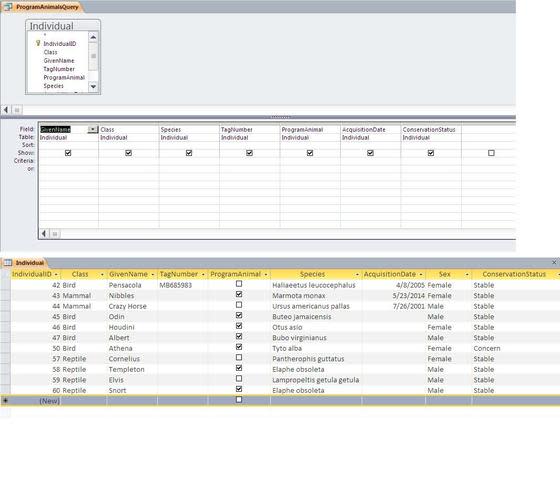
The report is based on this table and query.
Adding the code
To add on-the-fly grouping capability, we'll use each column's click event. It's intuitive -- it's a functionality that's available in many tools. To add the code, open the report in Design view, click the View Code button in the Tools group, and then add the code in Listing A to the report's module. (Don't copy the code from the web page, as the Visual Basic Editor will complain about web characters.)
Listing A
Option Compare Database Private Sub AcquisitionDate_Label_Click() 'Set grouping field. Me.GroupLevel(0).ControlSource = "AcquisitionDate" End Sub Private Sub Class_Label_Click() 'Set grouping field. Me.GroupLevel(0).ControlSource = "Class" End Sub Private Sub ConservationStatus_Label_Click() 'Set grouping field. Me.GroupLevel(0).ControlSource = "ConservationStatus" End Sub Private Sub GivenName_Label_Click() 'Set grouping field. Me.GroupLevel(0).ControlSource = "GivenName" End Sub Private Sub ProgramAnimal_Label_Click() 'Set grouping field. Me.GroupLevel(0).ControlSource = "ProgramAnimal" End Sub Private Sub Species_Label_Click() 'Set grouping field. Me.GroupLevel(0).ControlSource = "Species" End Sub Private Sub TagNumber_Label_Click() 'Set grouping field. Me.GroupLevel(0).ControlSource = "TagNumber" End Sub
There's an event procedure for each column, but realistically, you probably won't need to group by each column in a report. Each procedure sets the report's first group level to the label's corresponding field in the underlying data source.
Return the report to Report View and click any of the column header labels to set the group level, accordingly. For example, to group by the animals' given names, click the Given Name column's label, as shown in Figure C. Go ahead and click them all, and view each new grouping.
Figure C
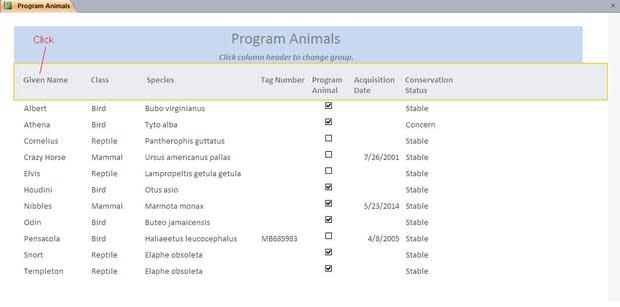
Click a few labels to see the grouping at work.
Now, before we move on, let's review how this works.
About GroupLevel
Each of the click events in Listing A sets the report's group level to the label's corresponding field. Technically, this property setting is an array, and the numeric argument specifies the level. That means you can group (or sort) on more than one field, and each field would represent a level. The first possible level is 0. Each subsequent group works within those that precede it. You can specify up to 10 levels.
You can use this property when opening a report using the Report_Open event as follows:
Private Sub Report_Open(Cancel As Integer) Me.GroupLevel(0).ControlSource = Forms!criteria End Sub
The criteria represents a control or expression that identifies a valid field within the report. This comes in handy when you'd like to use the same report but offer different grouping and sorting options when opening it. If those options are limited, you can prompt the user and pass the results to the event. This configuration offers a lot of potential.
Our event procedures have a simpler task. Each sets the first (and as yet only) grouping level to the label control's corresponding field.
Tweak groups
You could stop with this simple set of grouping event procedures, but most likely, you'll want to tweak some groups a bit more. We can illustrate this need by looking at the report grouped on the Class field. As you can see in Figure D, the rest of the data is in no particular order. There's only one species -- Elaphe obsolete -- that's repeated, but grouping them together would be the next logical step.
Figure D
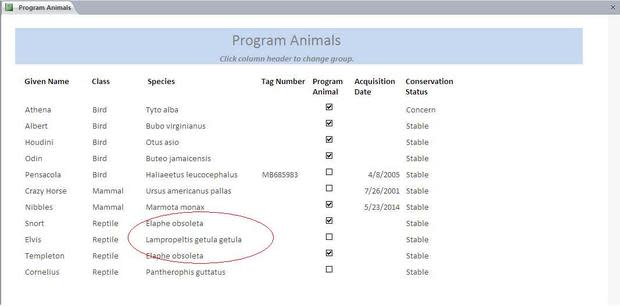
This report could use a second grouping level when first grouping by the Class field.
Earlier, I told you that I set the report's first group, Species, using the Report Wizard when I created the report. Doing so created the report's first group object for level 0. If you want additional levels, you must create that level's group object first. You can't just drop in a second grouping statement such as:
Me.GroupLevel(1).ControlSource = "Species"
That quick solution would be nice, but it won't work. There are easy and hard ways to add a group object to an existing report. We'll discuss two easy ways. VBA is the hard way, and we won't venture into that territory in this article.
The easiest way is to let the Report Wizard do it. When creating the report, you can set several group levels. I set one on the Species field. When possible, you can set the potential grouping levels using the wizard, and the finished report will have a group object for each level specified. Then, you can use the lone statement to reset each level on the fly (Listing A). That won't always be possible.
If you're adding groups after the fact, you can add the group manually as follows:
Open the report in Design view.
Click Group & Sort in the Grouping & Totals group to open that pane (Figure E). This pane displays the existing group on the Species field.
Figure EFigure E Add a second group on the same field by clicking Add a group and then choosing Species from the resulting list (Figure F).
Figure FFigure F Save the report.


You added a second grouping level (group object in VBA terms) to the report without changing its default grouping pattern. Now, some serious developers will say this is cheating -- you should add the group object using VBA. Frankly, that path is fraught with pitfalls unless you're a serious developer and know your way around those holes. I'm showing you an easier way to get the same results.
Once you have that second level, return to the report's module and add a lone GroupLevel statement to the Class label's Click event as shown in Listing B.
Listing B
Private Sub Class_Label_Click() 'Set grouping field. Me.GroupLevel(0).ControlSource = "Class" Me.GroupLevel(1).ControlSource = "Species" End Sub
Figure G shows the results of sorting by the Class field after adding the second group level.
Figure G

Try the new sort on the Class field.
If your report suddenly displays different formatting, such as extra white space and shaded rows, return the report to Design view and close the new Species group header to remove the white space. In addition, check the Detail section's Background property and adjust to suit your requirements.
Sort a group
You might have noticed that two of the groups, Tag Number and Acquisition Date, contain blank values that sort to the top by default. If you want values on the top and blanks on the bottom, you can add a sort to the 0 group level as shown in Listing C.
Listing C
Private Sub AcquisitionDate_Label_Click() 'Set grouping field. Me.GroupLevel(0).SortOrder = True Me.GroupLevel(0).ControlSource = "AcquisitionDate" End Sub
You can see the result of grouping by the Acquisition Date in Figure H. Use True to specify a descending sort and False for ascending.
Figure H

Change a group's sort order.
This change comes with a price tag though. Once you set the sort order for a group level, it sticks. That means you must adjust all of the event procedures to set the sort level explicitly, setting the others to False. In this report, doing so isn't a big deal, but it's something to consider. (The demonstration database [download] has a sorting statement for each event.)
End results
Because the grouping and sorting is on the fly, the report always opens with the Species field grouped. You can change the group by clicking any of the labels at the top of each column. Clicking the Class label will also group by species within the class group. Both the tag number and acquisition date groups have a sort statement that forces the values to the top. This route isn't the way a professional developer would approach this problem, but it is a solution that most users can apply themselves without advanced knowledge of VBA.
Send me your question about Office
I answer readers' questions when I can, but there's no guarantee. When contacting me, be as specific as possible. For example, "Please troubleshoot my workbook and fix what's wrong" probably won't get a response, but "Can you tell me why this formula isn't returning the expected results?" might. I'm not reimbursed by TechRepublic.com for my time or expertise, nor do I ask for a fee from readers. You can contact me at susansalesharkins@gmail.com.
